Step-by-Step Guide to Winterizing Your Sprinkler System
As we begin to move into the fall months, it is time, once again, to look into winterizing your sprinkler system. Winterizing your system is an important step in the maintenance of your sprinkler system, and an integral part of making sure that when spring rolls around again the sprinkler system will function properly without needing much in the way of repair.
Winterizing your sprinkler system requires a bit of know-how, so if you’re unsure of your abilities, it may be best for you to hire a professional to help you. If done incorrectly, you can cause a lot of damage to your sprinkler system, so act with care and make sure you know what you’re doing before you attempt to winterize your own sprinkler system.
For those who do not find this task too daunting, here are the basic steps to winterizing a sprinkler system. This guide will assume that you live in Colorado, where the ground is likely to be cold enough during winter to freeze (and burst) your pipes; if you live elsewhere, the first step you should take is to check a frost line map to see if you actually need to winterize your system.
1. Shut Off The Water
The first step to making sure that you can winterize your sprinkler system successfully is to shut off the flow of water. Most systems have a water valve located somewhere in your house, often in the garage. Shutting this off is essential to being able to successfully complete the rest of the following steps.
2. Shut Down The Controller
If your sprinkler system is a manual one, then you can skip this step. Depending on the controller you have, you can either set it to ‘rain mode’ or you can just turn it off. If your controller has the ‘rain mode’ setting, that’s the easiest way to shut it down and save yourself time when turning it on in the spring.
3. Remove Water From Risers And Take Care Of Backflow Preventers
Removing water from the risers of your sprinkler system helps to prevent damage at some of the most vulnerable points. Depending on your setup, you can most likely remove the water with a wet/dry vac. If there are valves in your system that are above ground, you should drain the water from them and store them indoors.
Removing the backflow preventers can be as simple as uncoupling them from the union connections in your sprinkler system. If your sprinkler system doesn’t use union connections, it’s best to have a professional remove the backflow preventers, and consider installing union connections when the ground thaws out. If you remove the preventers yourself, be sure to insulate the pipes that you remove them from.
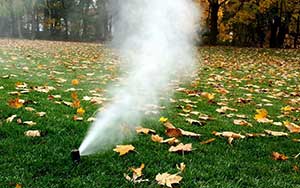
4. Blow Out The Sprinkler System
This is the best way that you can go about removing the water from your sprinkler system, but it also requires skill. Again, if you’re not sure of yourself, hiring a professional is the best way to go.
Blowing out a sprinkler system requires an air compressor. If you do not have a sizeable one, you will need to rent one from your local hardware store.
You start by removing the backflow compressor and connecting the air compressor to the backflow preventer riser. Turn on the valves for the sprinklers one by one, then you simply blow out the water until there’s none left. Do not leave the compressor running any longer than you need to, and do not let the air pressure reach 50 PSI or higher.
This is a good guide for how to winterize your basic home sprinkler system. If you’re not sure about the terms, about how to operate an air compressor, or about your ability to deal with mechanical devices, it’s much better for you to hire professional help than to risk damage to the system.